
A Complete Guide to Understanding DNS: From Basics to Troubleshooting
Introduction
Welcome to the ultimate guide on understanding the Domain Name System (DNS). If you’ve ever wondered about how the internet knows where to send your request when you type a URL into your browser, or how your email finds its way to the right inbox, then you’re in the right place. This guide is designed to take you from the basics to a comprehensive understanding of DNS, how it impacts your web presence, and how to troubleshoot common issues.
We’ll uncover the layers behind the internet’s address book, explaining concepts in a way that’s accessible to both beginners and more experienced users. You’ll learn about DNS records, how to set them up, and how they interact with your domain and web hosting. We’ll also touch on the importance of DNS security, its effect on website performance, and guide you through the ins and outs of DNS propagation.
By the end of this guide, you’ll not only have a solid grounding in DNS but also a thorough understanding of how it’s interconnected with many other aspects of your web presence. Whether you’re a website owner, aspiring IT professional, or simply a curious internet user, there’s something here for everyone.
So, let’s dive in and demystify DNS together!
Estimated reading time: 56 minutes
Table of contents
- A Complete Guide to Understanding DNS: From Basics to Troubleshooting
- Introduction
- Demystifying DNS
- DNS Record Types Explained
- Setting Up DNS for Your Domain
- The Role of DNS in Web Hosting and Domain Management
- Troubleshooting Common DNS Problems
- DNS and Security
- The Impact of DNS on Website Speed and Performance
- Navigating DNS Propagation
- Conclusion
- Frequently Asked Questions about Domain Name System (DNS)
Demystifying DNS
The Domain Name System (DNS) serves as one of the most fundamental and crucial components of internet functionality. It’s the invisible force that smoothly directs your online navigation, making your internet browsing experience intuitive and straightforward. Despite its critical role, the DNS remains an enigma to many internet users.
In this section, we aim to dispel the mystique surrounding DNS, starting with a basic understanding of what DNS is, how it operates, and its indispensable role in our digital lives. This knowledge will provide a solid foundation for comprehending the more intricate aspects of DNS that we will discuss later in this guide.
So let’s pull back the curtain and explore the fascinating world of the Domain Name System.
What is DNS?
DNS, short for Domain Name System, is essentially the phonebook of the internet. We interact with domain names like www.google.com on a daily basis. However, web browsers and the underlying network infrastructure primarily interact with Internet Protocol (IP) addresses, such as 172.217.14.206, which is not easy to remember for most human beings.
This is where DNS comes in handy. It translates the human-friendly domain names into computer-friendly IP addresses. Without DNS, we would need to remember the specific IP addresses of all the websites we want to visit, which is neither practical nor feasible.
In simpler terms, when you type a URL into your web browser, the DNS system kicks into gear, translating that domain name into the corresponding IP address and then directing your browser to the correct website. This seamless process happens in the background within milliseconds, enabling the smooth internet experience that we often take for granted.
In summary, DNS plays a critical role in the digital communication process, ensuring that every query reaches the right destination without the need for users to memorize complex numerical IP addresses.
How Does DNS Work?
The Domain Name System (DNS) works in a surprisingly straightforward, yet intricate manner. Whenever you enter a URL (like www.example.com) in your browser, several steps occur in the background to transform that human-readable website address into a machine-readable IP address. Here’s an overview of the process:
- DNS Query: Initially, your computer generates a DNS query when you type in a website address. This query acts as a request for the IP address associated with the entered domain name.
- Recursive DNS Servers: If your local DNS cache (temporary storage on your computer) doesn’t contain the required information, your computer sends the DNS query to a recursive DNS server. This server is usually provided by your internet service provider (ISP).
- Root DNS Servers: If the recursive DNS server doesn’t have the required information cached, it will send the query to a root DNS server. This server doesn’t know the IP address of your requested domain, but it knows where to direct the query next.
- TLD DNS Servers: The root server directs the recursive server to a Top Level Domain (TLD) DNS server, based on the extension of the domain (.com, .org, .net, etc.). This TLD server, while it doesn’t know the exact IP address, knows the address of the authoritative DNS server that stores the exact IP address.
- Authoritative DNS Servers: Finally, the authoritative DNS server has the correct IP address for the specific domain name and sends it back through the chain – to the TLD server, the root server, and eventually back to the recursive server.
- Response to the Client: The recursive server, now having the IP address, sends it back to your computer. Your computer stores this information in its local DNS cache for future requests, and your browser can now use this IP address to load the website.
This whole process, although it involves multiple steps and servers around the world, takes only milliseconds to complete. It’s a testament to the efficiency and power of the DNS, allowing us to navigate the internet with ease and speed.
Role of DNS Servers
DNS servers play a pivotal role in the way the internet operates, as they are responsible for resolving human-readable domain names into machine-readable IP addresses. However, the process involves various types of DNS servers, each fulfilling a unique function. Let’s explore the roles of each DNS server involved in this process:
- Local DNS Resolver (or Cache): The first point of contact in the DNS lookup process is typically the local DNS resolver in your operating system, which stores information about recent lookups for a certain period of time. If the requested domain’s information is in the local cache, it will provide the IP address, bypassing the need for a full DNS lookup.
- Recursive DNS Servers: If the requested information isn’t in the local cache, the query is passed to the recursive DNS server, usually provided by your ISP or a third-party DNS service like Google DNS or OpenDNS. The recursive DNS server makes subsequent requests to find the correct IP address if it’s not already in its cache.
- Root DNS Servers: If the recursive DNS server doesn’t have the information in its cache, it then reaches out to one of the 13 root DNS servers. These servers don’t know the IP addresses for domains but they can direct the query to the appropriate Top Level Domain (TLD) server.
- TLD DNS Servers: The TLD servers store information about domains based on their extensions such as .com, .org, or .net. These servers don’t know the exact IP addresses either, but they can point the recursive server to the authoritative DNS server for the given domain.
- Authoritative DNS Servers: The authoritative DNS server is the final stop in the DNS lookup process. It holds the DNS records for the specific domain, including its IP address. Once the recursive DNS server receives this information, it passes it back to the client (i.e., your computer).
This is a simplified explanation of the roles of DNS servers. In reality, the process involves more layers and numerous servers worldwide, each contributing to the effective functioning of the DNS system.
DNS Queries Explained
DNS queries are the requests that are made to DNS servers to resolve domain names into IP addresses. Let’s dissect the DNS query process to understand it better:
- Recursive Query: This is the first step in a DNS lookup process where a client (e.g., a web browser) sends a request to a DNS resolver to obtain the IP address associated with a domain name. This is called a recursive query because the DNS resolver must keep querying other DNS servers until it gets a definitive answer.
- Iterative Query: If the DNS resolver doesn’t have the requested information in its cache, it sends an iterative query to a root DNS server. The root DNS server responds with a referral to a TLD DNS server that manages the requested domain’s extension (like .com, .org). The DNS resolver then makes another iterative query to the TLD DNS server, which in turn refers the DNS resolver to the authoritative DNS server for the specific domain.
- Non-recursive Query: Once the DNS resolver knows which authoritative DNS server to ask, it sends a non-recursive query to that server. Unlike recursive queries, non-recursive queries expect the server to provide a definitive answer. The authoritative DNS server then responds with the requested IP address or an error message if the domain does not exist.
- Response: The DNS resolver finally sends the answer back to the client. The client can now connect directly to the server IP address it received, effectively translating the human-friendly domain name into a computer-friendly IP address.
This is a high-level overview of DNS queries. The actual process involves more complexities and protocols to ensure efficient and accurate DNS resolution. It’s also crucial to note that DNS resolvers usually cache DNS responses to speed up subsequent requests to the same domain, reducing the need for full DNS lookups.
Why is DNS Essential?
The Domain Name System (DNS) plays a critical role in the functioning of the internet, making it a fundamental component of online communication. Here are some reasons why DNS is so essential:
- Human-Friendly Addresses: Computers communicate using numerical IP addresses, but remembering strings of numbers for each website isn’t practical or efficient for humans. DNS provides a user-friendly way to access websites by allowing us to use easy-to-remember domain names.
- Connectivity: DNS serves as the internet’s phonebook, enabling devices to connect with each other over a network. Without DNS, you would need to remember the IP addresses of each website you want to visit – a cumbersome task given the vast number of sites on the web.
- Email Delivery: DNS is responsible for routing emails to the correct servers. When you send an email, your email server uses DNS to find the recipient’s mail server and deliver the email to the correct location.
- Load Balancing and Redundancy: DNS plays a critical role in distributing user requests across multiple servers for load balancing. If a server is down or unavailable, DNS can redirect traffic to another operational server, enhancing the reliability and redundancy of online services.
- Enables Internet Growth: DNS allows for the smooth expansion of the internet by making it easy to add new sites and servers without disrupting existing structures. This flexibility is crucial for the scalability and resilience of the internet.
- Security: DNS security extensions (DNSSEC) help protect against malicious activities like cache poisoning, where an attacker redirects traffic to a different website. These extensions add an extra layer of authentication, verifying that the information is coming from a legitimate source.
In conclusion, DNS is a crucial part of the internet infrastructure, ensuring seamless user experience, supporting scalability, and enhancing security. It’s virtually impossible to navigate the modern web without it.
DNS Record Types Explained
As you journey through the world of internet resources and web management, you will come across several different types of DNS records. Each of these record types serves a unique purpose, directing a part of your domain’s traffic or providing essential information about your domain.
At PD Hosting, we know how important it is for you to understand and manage these DNS records effectively. In this section, we’ll dive deeper into different types of DNS records, their uses, and how they shape your domain’s behavior on the internet.
Understanding DNS records and their functions is critical for proper domain management, optimizing email delivery, load balancing, routing your traffic effectively, and more. Not to mention, a well-configured DNS setup can significantly improve your website’s performance and security.
Stay with us as we navigate through the complex but fascinating world of DNS records. We’ll demystify the meaning behind acronyms like A, MX, TXT, and more. These elements form the backbone of how your domain communicates with the rest of the internet and are instrumental in how PD Hosting provides reliable and robust domain management services.
Let’s start exploring these DNS record types!
What Are DNS Records?
DNS records, also known as resource records, are fundamental units of information in the DNS system that provide specific details about a domain and its associated services. They form an essential part of a DNS zone, which is a collection of all the DNS records for a specific domain.
DNS records guide web traffic to the right place by mapping domain names to the IP addresses of the servers where their resources are hosted. Think of them as the roadmap of the internet. Just like how a GPS navigation system uses your destination’s address to guide you there, DNS records direct web traffic based on the server’s IP address.
Each DNS record type serves a distinct purpose. They may point your domain to a website, specify mail servers for email delivery, verify domain ownership, facilitate domain redirections, or perform various other functions.
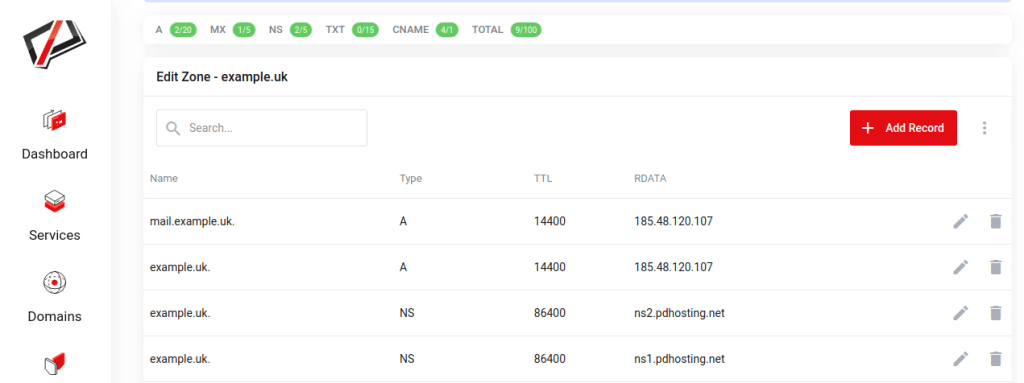
At PD Hosting, we offer an intuitive DNS management interface where you can add, delete, or modify these DNS records with ease. Understanding these records is critical to efficiently managing your domain, website, and other internet services. Let’s delve deeper into some of the most common DNS record types and what they do.
Understanding A, CNAME, MX, TXT Records, and More
When navigating through your DNS management console at PD Hosting, you’ll come across different types of DNS records. These include A, CNAME, MX, TXT records, and many others. Each record type serves a unique purpose and facilitates different functionalities related to your domain.
Let’s examine some of the most frequently used DNS records:
A (Address) Records
A Records are perhaps the most common DNS records. They map a domain name directly to its corresponding IP address, which is typically the IP address of a server where the website data is stored. This IP address can be either IPv4 (a sequence of four numbers separated by dots) or IPv6 (a more complex format to accommodate more addresses).
A Record Example
This example represents an A Record for a website hosted on a server with the IP address 192.0.2.1.
example.uk. IN A 192.0.2.1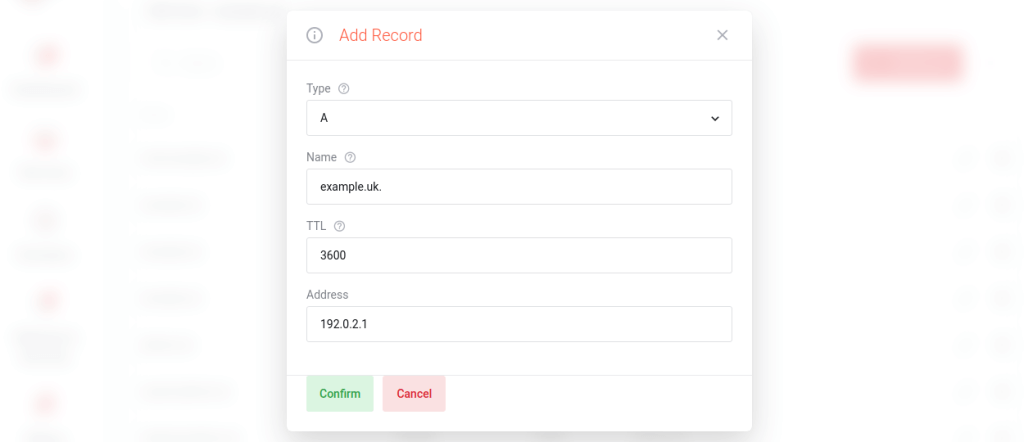
In this example, example.uk is the domain name, IN stands for internet, A is the record type, and 192.0.2.1 is the IP address of the server where the website is hosted.
CNAME (Canonical Name) Records
CNAME Records are used to map a domain (or subdomain) to another domain name. In essence, they work as aliases, redirecting one domain to another. For instance, you might have ‘www.example.uk’ as a CNAME record pointing to ‘example.uk’ so that traffic to either address ends up at the same destination.
CNAME Record Example
This is an example of a CNAME Record that points the www version of a website to the non-www version:
www.example.uk. IN CNAME example.uk.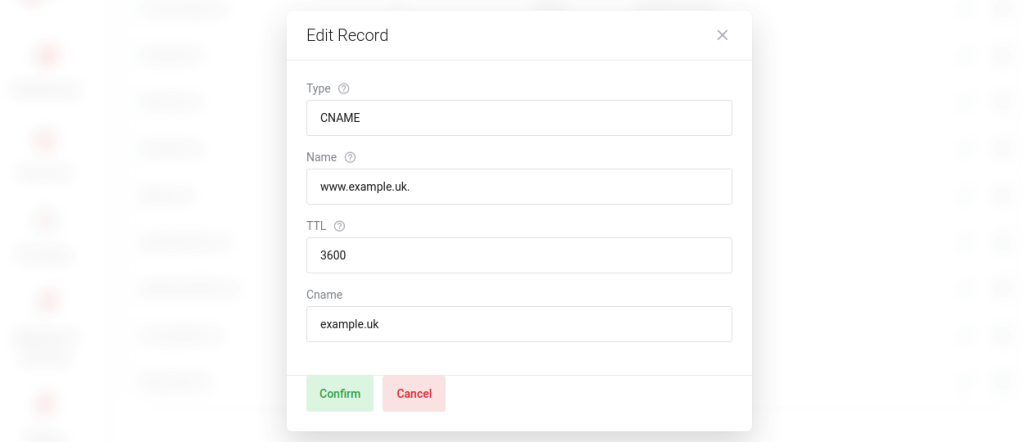
Here, www.example.uk is the alias, IN stands for internet, CNAME is the record type, and example.uk is the canonical domain.
MX (Mail Exchanger) Records
MX Records are crucial for routing email correctly across the internet. They point to the servers that should receive email for your domain. If you have a custom domain and you want to receive email at that domain (like ‘[email protected]’), you’ll need to set up MX records pointing to your email provider’s servers.
MX Record Example
Here’s an example of an MX Record for a mail server (for instance, Gmail):
example.uk. IN MX 10 ASPMX.L.GOOGLE.COM.
In this example, example.uk is the domain, IN stands for internet, MX is the record type, 10 is the priority (lower numbers have higher priority), and ASPMX.L.GOOGLE.COM is the mail server for Gmail. The priority is used when there are multiple MX records; the server with the lowest priority is tried first.
TXT (Text) Records
TXT Records are used to hold text information for various purposes. They can be used to verify domain ownership, ensure email security via SPF (Sender Policy Framework), DKIM (DomainKeys Identified Mail), and DMARC (Domain-based Message Authentication, Reporting & Conformance) records, or other services like Google verification or even notes for administrators.
TXT Record Example
This example represents a TXT Record used for domain verification, for instance by Google to verify that you own the domain:
example.uk. IN TXT "google-site-verification=6PnjFq0Z7N7bjaK1aB3VKJjou3GQ3B8Hsa033ldj6Zg"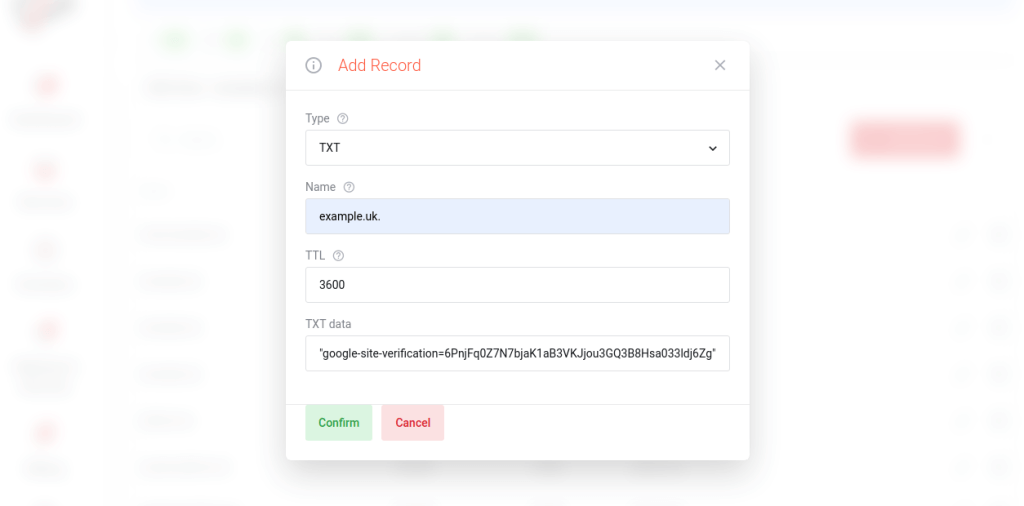
In this example, example.uk is the domain name, IN stands for internet, TXT is the record type, and the part in quotes is the actual text record – in this case, a Google site verification code.
This TXT record would be used by Google’s servers to confirm that the person attempting to add the domain to their Google account has control over the DNS for that domain.
These are just some of the common DNS record types you’ll encounter in DNS management. Others include AAAA (maps a domain to an IPv6 address), NS (Nameserver Records), PTR (Reverse DNS lookup), SRV (Service Records), and more. Each plays a different role, and their combination allows for diverse and flexible DNS configurations. Understanding these records enables you to maintain and optimize your domain configuration effectively.
Setting Up DNS for Your Domain
Domain Name System (DNS) setup is a crucial step in making your website accessible to the world. It’s like the switchboard operator for the internet, directing traffic to where it needs to go. If your DNS settings aren’t configured correctly, users won’t be able to reach your website. At PD Hosting, we understand the importance of properly configuring DNS for your domain, and in this section, we’ll walk you through the steps necessary to set up DNS for your domain successfully.
Whether you’re setting up a new website or moving an existing one to PD Hosting, you’ll need to configure DNS records to ensure that web traffic is routed correctly. DNS setup typically involves creating or updating a series of DNS records for your domain.
This process may seem complex if you’re new to web hosting, but don’t worry. We’ll explain each step in detail to help you understand how DNS setup works, from changing nameservers to setting up individual DNS records like A, CNAME, MX, and TXT records. So, let’s dive in and learn how to set up DNS for your domain.
Step-by-Step Guide to Configuring DNS
Before we start, it’s important to understand that DNS changes may take some time to propagate across the internet due to caching at various levels. This period can vary from a few minutes to 48 hours or more. So, don’t panic if your changes don’t reflect immediately.
Here is a step-by-step guide to help you configure DNS:
Step 1: Choose Your DNS Provider
You can choose to use your domain registrar’s DNS servers or switch to a third-party DNS provider. Many hosting companies, including PD Hosting, also offer DNS services.
Step 2: Update Your Domain’s Nameservers
You’ll need to point your domain to the nameservers of the DNS provider you’ve chosen. This is usually done through your domain registrar’s control panel.
Step 3: Add DNS Records
The DNS records you’ll need to configure will vary depending on your specific needs, but here are the common ones:
- A Record: This points your domain to an IP address. For example, you may point ‘yourdomain.com’ to the IP address of your web server.
- CNAME Record: This record points your subdomain to another domain name. For example, ‘www.example.com’ could be a CNAME to ‘example.com’.
- MX Record: This record directs email for your domain to the appropriate mail server. If you’re using a third-party email provider, they’ll provide the necessary MX records.
- TXT Record: This record is often used for various verification purposes. For example, it can be used to verify domain ownership or set up email authentication methods like SPF, DKIM, and DMARC.
Step 4: Test Your DNS Settings
Finally, once you’ve configured your DNS settings, use an online DNS lookup tool to ensure that your domain is resolving correctly. Also, send a test email if you’ve set up MX records to ensure email deliverability.
Remember, patience is key when working with DNS. Due to propagation delays, it might take some time for these changes to reflect globally.
Changing Nameservers: A Tutorial
Changing nameservers is a critical part of configuring DNS for your domain. A nameserver is a server on the internet that is specialized to handle queries regarding the location of a domain name’s various services. When you change the nameservers, you are essentially directing your domain to use a different DNS provider.
Here’s a simple tutorial on how to change nameservers. Please note that the exact steps may vary slightly depending on your domain registrar:
Step 1: Obtain the Nameserver Details from Your DNS Provider
If you’re using a DNS service provided by your hosting company, such as PD Hosting, they will provide you with the nameservers you should use. It generally looks like this: ns1.pdhosting.net, ns2.pdhosting.net, and so on.
Step 2: Log In to Your Domain Registrar’s Website
Access your domain registrar’s website and log in to your account. Navigate to the section where your domain details are listed.
Step 3: Locate the Nameserver Settings
Find the section that allows you to edit or change your nameservers. This is often called “Nameservers”, “DNS Servers”, or something similar.
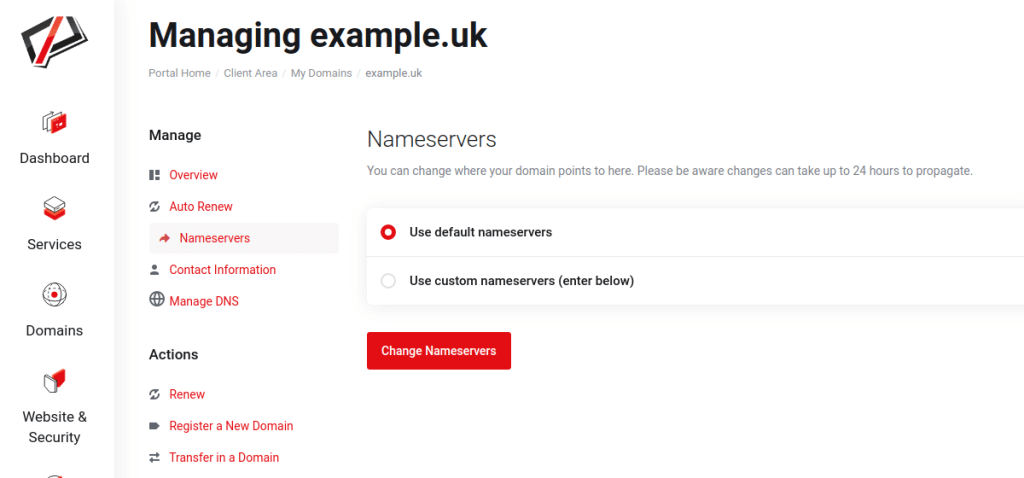
Step 4: Enter the New Nameserver Details
Replace the current nameserver entries with the new ones provided by your DNS provider. Make sure to save your changes.
Step 5: Wait for Propagation
Changing nameservers triggers DNS propagation, which can take anywhere from a few minutes up to 48 hours or more. During this time, your website may be temporarily inaccessible or it may be accessible intermittently.
Step 6: Verify the Changes
You can use an online tool such as a DNS Checker to verify that your nameservers have been updated correctly. Enter your domain name, and the tool should show the updated nameservers.
Remember that changing nameservers is a significant change that affects how your domain operates. Always double-check the nameserver details before updating them. Additionally, consider the timing of this change, as your website and email service may be temporarily disrupted due to propagation.
Setting Up DNS Records: A Practical Approach
Setting up DNS records can seem daunting, but with the right understanding and guidance, it’s a task that can be accomplished with ease. Below, we provide practical, step-by-step instructions for setting up some of the most commonly used DNS records: A, CNAME, MX, and TXT.
Do note that the exact process for setting up these records can vary depending on the DNS provider or control panel you’re using. Here, we will consider a general approach.
How to Set Up A Records
An A Record (Address Record) points a domain or subdomain to an IP address.
Steps to add an A record:
- Log in to your DNS control panel.
- Find the section to manage your DNS records. It could be named DNS Management, Name Server Management, or something similar.
- Choose to add a new record, and from the list of record types, select ‘A’.
- Enter the hostname for which the record is to be created. For example, ‘www’ if the record is for www.yourdomain.com.
- Enter the IP address you wish to point the domain or subdomain to.
- Save the record and wait for the changes to propagate.
How to Set Up CNAME Records
A CNAME record (Canonical Name record) is used to map a certain domain or subdomain to another domain name.
Steps to add a CNAME record:
- Log in to your DNS control panel.
- Find the DNS Management section.
- Choose to add a new record, and from the list of record types, select ‘CNAME’.
- In the host field, enter the subdomain that you wish to point to another domain.
- In the points to field, enter the domain you wish to point the subdomain to.
- Save the record and wait for the changes to propagate.
How to Set Up MX Records
Mail Exchanger (MX) records are used to specify the mail servers that are responsible for a domain.
Steps to add MX records:
- Log in to your DNS control panel.
- Find the DNS Management section.
- Choose to add a new record, and from the list of record types, select ‘MX’.
- In the host field, enter the domain name.
- In the points to field, enter the mail server’s address.
- Set the priority for the mail server. Lower values denote higher priority.
- Save the record and wait for the changes to propagate.
How to Set Up TXT Records
TXT records are used for a variety of purposes, including verification purposes, providing SPF data, and more.
Steps to add TXT records:
- Log in to your DNS control panel.
- Find the DNS Management section.
- Choose to add a new record, and from the list of record types, select ‘TXT’.
- In the host field, enter the domain or subdomain the TXT record is for.
- In the text value field, enter the text for the record.
- Save the record and wait for the changes to propagate.
These are the basic steps to add the most common types of DNS records. Always remember that changes to DNS settings can take some time to propagate across the internet.
Setting Up Email Forwarding: A Comprehensive Guide
Setting up email forwarding allows you to automatically forward email messages sent to an email address at your domain to a different email address. This can be particularly useful if you have multiple email addresses and want to manage all your emails from a single account, or if you want to distribute incoming emails to different members of your team.
The process for setting up email forwarding varies depending on your email or domain hosting provider, but the general steps usually involve the following:
Step 1: Log in to your Email or Domain Hosting Provider
Access the administrative panel of your email or domain hosting provider.
Step 2: Navigate to the Email Forwarding Section
Look for the email settings, email management, or a similar section. In that section, find the email forwarding settings.
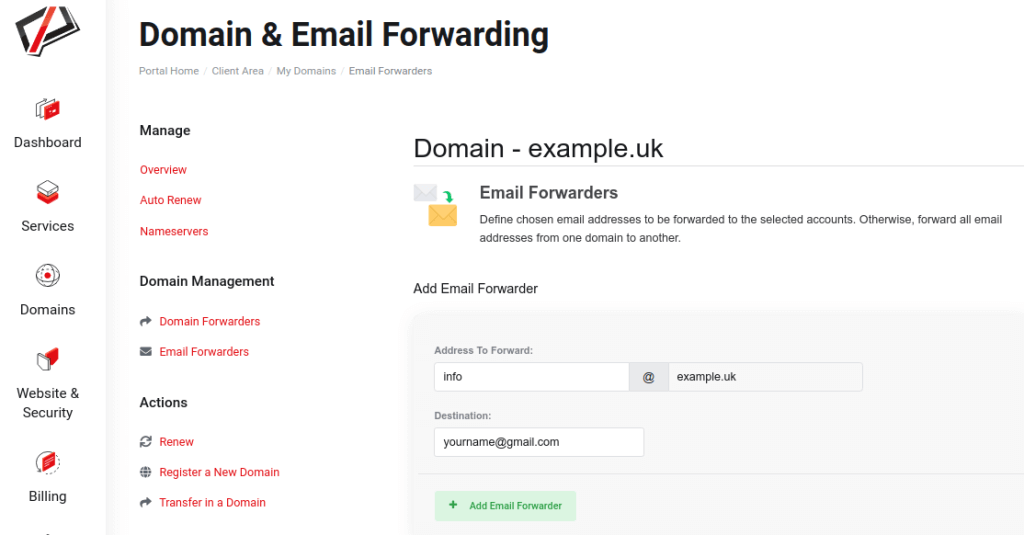
Step 3: Add a New Forwarding Rule
Click on “add forwarding” or a similar option. You’ll need to provide at least two pieces of information: the email address at your domain that you want to forward from (the source address), and the email address that you want to forward to (the destination address).
For instance, if you want to forward all emails sent to [email protected] to your personal email account [email protected], you would enter these two email addresses in the respective fields.
Step 4: Save Your Changes
After setting up the forwarding rule, don’t forget to save your changes.
Step 5: Test Your Email Forwarding Rule
Send a test email to the source address to ensure that the email is correctly forwarded to the destination address.
Remember that it may take a while for the changes to take effect, so don’t worry if the forwarding doesn’t work immediately.
These steps should help you set up basic email forwarding for your domain. For more advanced settings or troubleshooting, refer to the documentation provided by your email or domain hosting provider. It’s also important to note that some providers may require additional steps or provide different options for email forwarding. Always consult your provider’s resources for the most accurate and updated information.
PD Hosting provides a straightforward and user-friendly interface to set up email forwarding, making it simple to manage your email addresses and ensure that you never miss an important message. If you’re using PD Hosting’s services and need further assistance, our support team is always available to help.
Understanding and Setting Up Domain Redirection
Domain redirection, also known as URL forwarding, is a technique that allows you to direct visitors from one web address to another. This is especially handy if you have multiple domain names that you want to lead to a single website, or if you’ve moved your web content and want to guide your visitors to the new location seamlessly.
Here’s a straightforward guide to help you understand and set up domain redirection:
Step 1: Understanding Domain Redirection
There are two types of domain redirection:
- 301 Permanent Redirect: Used when your website has permanently moved to a new URL. It also informs search engines that your site has moved, which helps to maintain your SEO rankings.
- 302 Temporary Redirect: Used when your website has moved to a new URL temporarily, such as during a site maintenance or redesign. It does not pass SEO ranking to the new URL, as the move is considered temporary.
Step 2: Decide the Type of Redirection
Choose between 301 and 302 redirection based on your needs. If you’re unsure, it’s generally safer to use a 302 redirect to avoid potentially damaging your site’s SEO.
Step 3: Log in to Your Domain Hosting Provider
Access the control panel of your domain hosting provider. In PD Hosting, navigate to your domain management panel.
Step 4: Find the Domain Redirection/Forwarding Section
Look for the domain settings or a similar section. Here, you should find the domain redirection or forwarding settings.
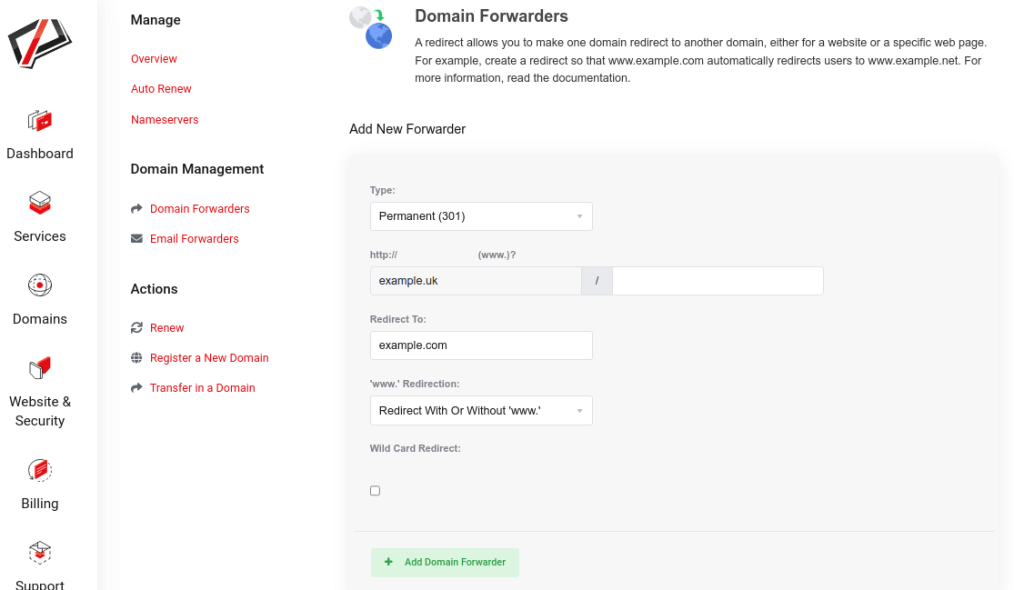
Step 5: Set up the Redirection Rule
Enter the domain name you want to redirect from in the ‘source’ field, and the URL you want to redirect to in the ‘destination’ field. Choose the type of redirect (301 or 302) if the option is provided.
Step 6: Save Your Changes
Click ‘Save’ or ‘Apply’ to finalize your changes. It may take a while for the changes to propagate, so the redirection might not work immediately.
Remember, when setting up a redirection, ensure that the destination URL is working correctly. Invalid or broken URLs can result in error pages, which might discourage visitors from returning to your website.
Domain redirection is a powerful tool for managing your online presence effectively. Whether you’re consolidating multiple domains, migrating your website, or just want to ensure that your visitors find what they’re looking for, understanding and utilizing domain redirection can greatly enhance your website’s usability and accessibility. PD Hosting offers an intuitive interface for managing domain redirection, making it easy for you to control where your visitors go when they type in your domain name.
The Role of DNS in Web Hosting and Domain Management
DNS plays a crucial role in the online presence of any business or individual, contributing significantly to both web hosting and domain management. Understanding how DNS affects these aspects can help you optimize your online resources, enhance your website’s performance, and improve overall user experience.
In the context of web hosting, DNS is the system that allows users to connect to your website. When you sign up for a web hosting service, such as PDHOSTING’s Hosting, WordPress VPS or Linux VPS, you’re essentially renting space on a server where your website files are stored. These servers have IP addresses, and DNS translates the domain names into these IP addresses so that visitors can access your site.
Regarding domain management, DNS plays a vital role in directing traffic to the right resources. When you register a domain, you have to specify DNS servers, often referred to as nameservers. These servers hold the DNS records for your domain. The nameservers you set determine where to send the users when they request your domain. If you change web hosts, you’ll typically need to update these nameservers to point to your new host’s DNS servers.
In short, DNS serves as the backbone of your online presence, ensuring your website is accessible to users worldwide. By effectively managing your DNS settings, you can ensure the stability of your website, improve load times, and provide a better user experience. In the next sections, we will delve deeper into common DNS issues, DNS security concerns, the impact of DNS on website performance, and the concept of DNS propagation, all of which are important for efficient web hosting and domain management.
DNS and Your Web Hosting Account
When you sign up for a web hosting account with PD Hosting, whether it’s for Website Hosting, WordPress Hosting, WordPress VPS or Linux VPS, the role DNS plays is pivotal in making sure your website is accessible to the world. Here’s how it works:
When you set up your hosting account, PD Hosting assigns your website a specific IP address on one of its servers. This IP address is essentially the ‘physical’ location of your website on the internet. However, humans are not great at remembering long strings of numbers, which is where DNS comes into play.
DNS is the system that translates your user-friendly domain name (e.g., www.example.com) into the IP address assigned by PD Hosting. When a user types your domain name into their web browser, a DNS query is initiated. The DNS system then guides that query through a sequence of servers until it arrives at your web hosting account and the specific IP address of your site. The website files stored at that IP address are then returned to the user’s browser and displayed as your website.
Thus, without DNS, the process of locating and displaying websites would be far more complex for the average user. By turning IP addresses into understandable and memorable domain names, DNS simplifies the way we navigate the web, making it a crucial element in managing your web hosting account.
Ensuring your DNS settings are correctly configured within your PD Hosting account is therefore crucial to ensuring your website’s visibility and accessibility. PD Hosting provides easy-to-use tools and customer support to assist you in managing these settings.
In addition to providing easy-to-use tools and customer support for managing DNS settings, PD Hosting offers an additional resource for our web hosting clients. If you have a web hosting account with PD Hosting, you can take advantage of our cPanel Tutorial – DNS Management playlist on our YouTube channel. This comprehensive tutorial series walks you through the process of managing DNS records using cPanel, giving you even more control over your website’s visibility and accessibility. With PD Hosting and our cPanel tutorial, you have the power to configure and optimize your DNS settings to ensure seamless functioning of your website.
How DNS Interacts with Domain Management
DNS and domain management are two interconnected parts of managing your online presence. Domain management refers to the process of registering and maintaining domain names, while DNS is the system that connects those domain names to the actual websites hosted on servers around the internet. Here’s how DNS interacts with domain management.
When you register a domain name with a registrar like PD Hosting, you’re essentially purchasing the rights to use that specific name for a set period of time. However, owning a domain name doesn’t automatically make your website appear when someone types that domain into their browser – that’s where DNS comes in.
Once you have a domain name, you need to tell the DNS system where to find your website when someone uses your domain. This is done by setting DNS records, such as A and CNAME records, to point to the IP address of your web hosting account.
For example, if you have a WordPress VPS or Linux VPS hosting account with PD Hosting, you’d set your DNS records to point to the IP address of that account. When someone types in your domain name, the DNS system will then look at those records and direct their browser to the IP address of your hosting account.
Managing these DNS settings is a crucial part of domain management. Many domain registrars, including PD Hosting, provide tools to manage these settings easily. From your PD Hosting domain management dashboard, you can update DNS records, change nameservers, set up email forwarding, and even configure domain redirects.
DNS and domain management might seem complex, but with the right tools and support, they’re manageable tasks that ensure your website is accessible to the world. PD Hosting is committed to providing the support and tools you need to navigate this essential part of managing your online presence.
Troubleshooting Common DNS Problems
We’ve all been there, a website isn’t loading as expected, emails aren’t being delivered, or there’s some other mystery issue that just doesn’t seem to make sense. More often than not, the culprit is an issue with DNS settings. The complex nature of DNS and its critical role in connecting your domain to your online services makes it a common source of issues. This part of our comprehensive guide will equip you with the knowledge you need to identify and solve common DNS problems.
Despite the complexity of the DNS system, understanding its basics and knowing where to look can greatly aid in troubleshooting. While you might feel intimidated initially, remember that every expert was once a beginner. With a systematic approach and a little patience, you’ll soon be able to troubleshoot common DNS issues.
At PD Hosting, we believe that knowledge is power. Hence, we’ll dive deep into common DNS issues, their causes, and solutions, giving you the tools to maintain a healthy DNS environment for your domain. Understanding these common issues will not only help you resolve problems faster but also prevent them from occurring in the first place.
Common DNS Issues and How to Solve Them
While there can be numerous DNS issues one can encounter, here are some of the most common ones along with their solutions:
DNS Propagation Delays
DNS propagation delay is the time it takes for DNS changes, like updating nameservers or DNS records, to take effect across the internet. This delay can range anywhere from a few minutes to 48 hours or more.
Solution: Unfortunately, there’s not much you can do to speed up DNS propagation. It’s best to plan ahead for any significant DNS changes, and consider making them during off-peak hours. You can monitor the progress of DNS propagation using various online tools, such as DNS Checker or WhatsMyDNS.
Incorrect DNS Settings
Entering the wrong information when setting up DNS records is a common mistake. This could lead to your website not loading correctly, emails not being delivered, and other issues.
Solution: If you suspect there’s an issue with your DNS records, review them to ensure they are correct. Check for typos, ensure the records are pointing to the correct location, and make sure you’ve entered the correct data for the specific type of DNS record.
DNS Server Unavailability
Sometimes, the DNS server itself might be down or experiencing issues, leading to an inability to resolve DNS queries.
Solution: If you’re using a third-party DNS provider like PD Hosting and are experiencing issues, it’s best to reach out to their support team. If the DNS server is down, they’ll likely be aware of it and working on a fix.
DNS Cache Issues
Sometimes your browser or operating system can hold onto old DNS information in its cache, even after DNS records have been updated. This can lead to you seeing an old version of a website or not being able to access it at all.
Solution: If you suspect this is the issue, you can try clearing your DNS cache. The method for doing this varies depending on your operating system and browser.
These are just a few examples of common DNS issues and their solutions. Understanding these can help you navigate the complex world of DNS more effectively and ensure your online presence is stable and reliable.
Understanding DNS Propagation Delay
DNS propagation is the process of updating every server across the world wide web with the latest information from a newly updated DNS record. This could be any type of record, like an A record, MX record, CNAME record, and so forth.
When you make changes to your DNS records on your hosting provider like PD Hosting, these changes are instantly updated on the authoritative DNS server. However, these changes need to reach the rest of the internet, and this is where DNS propagation comes into play.
Why does it take time? Well, to reduce the load on the authoritative DNS servers, other servers around the world store copies of this DNS information. This is known as DNS caching. These cached records stay in memory for a period known as the Time To Live (TTL). The TTL can vary, but it’s usually measured in seconds and could range from a few minutes to 48 hours or more. It’s only when the TTL expires that these servers will check with the authoritative DNS server for any updates.
The time it takes for these servers around the world to update their caches and hence reflect your DNS changes is known as DNS propagation delay. So, even though you’ve made a DNS change, some visitors might still be seeing your old site until propagation is complete.
It’s important to note that you have no control over this process and the time it takes. It’s dependent on the TTL setting of the DNS records, the location and configuration of the DNS servers, among other factors.
In general, you should plan for DNS changes to take up to 48 hours to fully propagate globally. However, in most cases, the propagation is often complete within a few hours.
Misconfigured Records: What to Do
Misconfigured DNS records can cause a multitude of problems, from your website not being accessible to emails not being received. It’s crucial to ensure that your DNS records are correctly set up to keep your domain functioning smoothly.
If you suspect your DNS records are misconfigured, follow these steps to troubleshoot and rectify the issue:
- Identify the problem: The first step is to determine what isn’t working correctly. Is your website not accessible, or are you not receiving emails? Once you’ve identified the problem, you’ll have a better idea of which DNS record might be causing the issue.
- Check your DNS records: Log in to your DNS management console on PD Hosting and review your DNS records. Ensure that they are correctly set up as per your requirements. For example, your A record should point to the IP address of your website server, and your MX records should point to your email server.
- Verify the values: Double-check the values of your DNS records. Are the IP addresses correct? Are the MX records pointing to the right email servers? Even a small typo can cause significant issues.
- Check the TTL values: The TTL value determines how long a DNS record is cached by DNS servers. If you’ve recently made changes to your DNS records, but the TTL value is very high, it could take some time for the changes to propagate.
- Use DNS Lookup Tools: There are various online tools available, such as Google’s Dig tool or DNS Checker, that can help you check your DNS records from servers worldwide. These tools can be useful in identifying propagation delays or misconfigurations.
- Contact support: If you’ve checked everything and still can’t identify the issue, it may be time to reach out to your domain or web hosting provider’s support team. Their technical staff will have the necessary expertise to assist with DNS-related issues. Always remember to provide them with as much information as possible about the problem, as this will help expedite the troubleshooting process.
Remember, DNS changes may take up to 48 hours to fully propagate due to TTL values (Understanding DNS Propagation Delay). Therefore, if you’ve made changes recently, you might just need to wait for a while. Always plan your DNS changes ahead of time to avoid any potential downtime.
DNS and Security
With the increasing digitalization of our world, security in all aspects of internet technology is becoming paramount, and DNS is not an exception. In this section, we delve into the crucial role of DNS in security and how it can be both a target and a shield against cyber threats.
Domain Name Systems, like any other component of the internet infrastructure, are subject to security vulnerabilities and threats. Manipulation of DNS data can lead to serious security breaches, including website hijacking, phishing, or denial of service attacks. Therefore, understanding how to secure DNS is an essential part of maintaining a safe and trustworthy online presence.
Understanding DNSSEC, recognizing DNS spoofing and its prevention, and acknowledging the role of DNS in Distributed Denial of Service (DDoS) attacks are some areas we’ll look into in this part. We’ll take you through these aspects to give you a thorough understanding of DNS and its relationship with online security. The more knowledge you have, the better prepared you are to protect your digital assets.
Next, let’s dive into each of these topics and expand your understanding of DNS security.
Understanding DNSSEC
DNS Security Extensions, or DNSSEC, is a suite of Internet Engineering Task Force (IETF) specifications designed to protect the internet from certain kinds of attacks on the DNS. It is a set of extensions to DNS that provide origin authentication of DNS data, data integrity, and authenticated denial of existence.
DNSSEC works by digitally signing data to assure its validity. When a DNS resolver receives a query response, it can verify the digital signature to confirm that the data hasn’t been tampered with during transit. In essence, DNSSEC adds a layer of trust on top of DNS.
Here’s a simple explanation of how DNSSEC works:
- Digital Signature: Every DNS record published by a DNSSEC-enabled DNS server is signed digitally with a private key. This digital signature is stored as a new DNS record, known as RRSIG.
- Public Key: The corresponding public key used to validate the digital signature is also stored as a DNS record known as DNSKEY.
- Signature Validation: When a DNS resolver receives a DNSSEC response, it uses the DNSKEY to verify the RRSIG. If the verification succeeds, the data is considered authentic and has not been manipulated during transmission.
- Chain of Trust: For DNSSEC to work effectively, there must be a chain of trust from the root zone to the DNS record. The Delegation Signer (DS) record is used to establish this chain of trust, pointing from a child zone back to the parent zone.
Implementing DNSSEC for your domains helps protect your online presence against cache poisoning, a type of attack where a rogue DNS entry is inserted into a DNS server’s cache, causing the server to return an incorrect response to queries. It’s important to note, however, that DNSSEC doesn’t provide confidentiality of data; it’s designed to ensure the authenticity and integrity of the exchanged DNS data.
DNS Spoofing: What is It and How to Prevent It
DNS Spoofing, also known as DNS Cache Poisoning, is a form of cyber-attack where false DNS (Domain Name System) responses are introduced into a DNS resolver’s cache, causing the name server to return an incorrect result record. This redirects traffic to the attacker’s desired IP address, often used for malicious activities such as phishing or distribution of malware.
For example, an attacker may poison the DNS cache with fraudulent DNS responses that lead users from a legitimate website to a deceptive site that the attacker controls.
To prevent DNS Spoofing, there are several strategies you can implement:
- Implement DNSSEC: As discussed in the previous section, DNSSEC provides a layer of security that validates DNS responses. By digitally signing data, DNSSEC can help ensure the integrity and authenticity of the data, reducing the chance of DNS spoofing.
- Use Trusted DNS Servers: Use DNS servers from reliable and reputable providers. Trusted DNS providers often have robust security measures in place to mitigate the risk of DNS spoofing.
- Regular Software Updates: Regularly update and patch your DNS software to protect against known vulnerabilities that attackers could exploit.
- Network Monitoring and Firewalls: Implement network monitoring to detect unusual traffic patterns and potential threats. Firewalls can help control the incoming and outgoing network traffic based on security rules.
- Encrypt DNS Traffic: Using DNS over HTTPS (DoH) or DNS over TLS (DoT) can encrypt your DNS queries, making it harder for attackers to intercept or alter your DNS traffic.
Remember, while these methods can significantly mitigate the risk of DNS spoofing, no solution is entirely foolproof. It’s essential to maintain regular monitoring and have a contingency plan in place in case of a security breach.
DDoS Attacks and DNS: What You Need to Know
DDoS (Distributed Denial of Service) attacks have emerged as a prominent threat to internet security. They are aimed at making a network, service, or machine unavailable to its intended users by overwhelming the target or its surrounding infrastructure with a flood of internet traffic. DNS servers can become victims of these attacks, causing severe consequences for websites and online services.
In a DNS amplification attack, a subtype of DDoS attacks, the attacker exploits vulnerabilities in DNS servers to turn small queries into larger payloads, overwhelming the targeted server with traffic. The attacker sends a request to a DNS server and spoofs the IP address of the target. When the DNS server sends back the response, it goes to the targeted IP address, creating a flood of unwanted traffic.
Protecting your DNS servers from DDoS attacks requires vigilance and strategic planning. Here are some strategies to consider:
- Traffic Monitoring: Regular monitoring of your network traffic can help detect anomalies or spikes in traffic that may indicate a DDoS attack.
- DNSSEC: While DNSSEC won’t prevent a DDoS attack, it can make it harder for attackers to exploit your DNS servers by providing validation of DNS responses.
- Redundant Network Architecture: Redundancy can help ensure your network stays up even if one part of it is under attack. It’s a good practice to have your DNS servers spread across different geographical locations.
- Rate Limiting: Implementing rate limiting on your DNS servers can help manage the traffic and prevent your server from being overwhelmed by requests.
- Professional DDoS Protection Services: These services can help absorb the flood of traffic during a DDoS attack and ensure your legitimate traffic isn’t disrupted.
Remember, preparation is key. By being aware of the threat of DDoS attacks and taking proactive steps, you can ensure that your DNS infrastructure remains secure and functional.
The Impact of DNS on Website Speed and Performance
The DNS (Domain Name System) plays a crucial role in your website’s performance. While often overlooked, DNS can significantly impact your website’s loading speed and overall performance. It serves as the first step in the complex process of delivering your website’s content to the end user, and any delays in this step can cause your website to load slowly.
In this section, we’ll delve into the dynamics of DNS and its effect on website speed and performance. We’ll discuss what DNS resolution time is, how DNS lookup affects the loading speed of your website, and the role of DNS caching in site performance. By understanding these aspects, you’ll be able to make informed decisions to optimize your DNS settings for better performance.
Your visitors expect your website to be fast and reliable. With the right DNS setup, you can ensure a smooth and fast experience that keeps users engaged and satisfied. So, let’s uncover how DNS affects your website speed and performance.
How DNS Impacts Website Loading Speeds
Every time a user enters your website URL in their browser, it sets off a chain of events. The first step in this process is a DNS lookup. DNS is like the phone book of the internet, matching the URL (the name) to an IP address (the phone number). This process is vital because computers use IP addresses to identify and access websites.
Here’s the catch: DNS lookups take time. How much time depends on several factors, including the speed of the user’s internet connection and the performance of the DNS server. The time taken to translate a domain name into an IP address is known as the DNS lookup time. And it’s during this period that a delay can occur, slowing down your website’s loading speed.
Imagine you want to call a friend, but first, you have to look up their number. The time you spend searching is like the DNS lookup time. Now, imagine if you had to do that every time you wanted to call anyone – it would significantly slow down the process of making a call. Similarly, slow DNS lookups can significantly slow down your website loading speed.
There are ways to speed up this process, like using a faster DNS server or implementing DNS caching, where the “phone numbers” (IP addresses) are stored locally for a while after a lookup, so the next time you “call” (access the website), you don’t have to “look up the number” (perform a DNS lookup) again.
In the following sections, we will delve into these aspects in more detail to provide you with a complete understanding of how DNS impacts website loading speeds.
DNS Lookup Time
As previously mentioned, DNS lookup time is the duration it takes for a DNS server to translate a domain name into an IP address. When a user wants to visit your website, their browser sends a query to a DNS server requesting the IP address associated with your domain name. This request-and-response process is the DNS lookup.
Here’s a simple breakdown of the steps involved in a DNS lookup:
- The user enters your website URL into their browser.
- The browser sends a request to a DNS resolver server. This server is typically provided by the user’s Internet Service Provider (ISP).
- If the DNS resolver has the required information cached from a previous lookup, it will return the IP address to the user’s browser immediately. If not, it forwards the request to the DNS root servers.
- The root servers direct the query to a Top-Level Domain (TLD) server (such as .com or .org).
- The TLD server then forwards the query to the authoritative DNS server for the specific domain.
- The authoritative DNS server finally responds with the IP address for the domain name.
- The DNS resolver receives this response and forwards the IP address to the user’s browser.
- The browser can now request the webpage from the server using the provided IP address.
Each of these steps takes time, adding to the total DNS lookup time. This time contributes to the total time it takes for a website to load in a user’s browser. The longer the DNS lookup time, the slower the website appears to load, even if everything else (like web hosting and website optimization) is configured for speed.
It’s worth noting that although the DNS lookup process seems lengthy, it’s typically measured in milliseconds. However, every millisecond counts when it comes to website performance and user experience.
In the upcoming sections, we’ll discuss strategies for reducing DNS lookup time and improving your website’s overall performance.
Role of DNS Servers in Website Speed
The speed of your website can be significantly affected by the efficiency and location of your DNS servers. When a visitor types your website’s URL into their browser, a DNS server needs to translate that URL into an IP address for the website to load. This process is called a DNS lookup.
Here’s why DNS servers play a crucial role in website speed:
- Response Time: The speed at which the DNS server responds to a lookup request impacts the overall loading time. A faster DNS server can retrieve the necessary information more quickly, thereby reducing the time it takes for the website to start loading.
- Caching: DNS servers cache information to speed up subsequent DNS lookups. If a user visits a website, the DNS server stores the information in its cache. When the same user or another user using the same DNS server visits the website again, the server can recall the cached information, thereby reducing the DNS lookup time.
- Load Balancing: Some DNS providers offer advanced services like load balancing. Load balancing distributes traffic across several servers or locations to ensure that no single server gets overwhelmed, which can significantly improve a website’s speed and availability.
- Anycast Networking: DNS servers implementing Anycast networking can reduce latency and increase site speed. In Anycast, multiple servers share the same IP address, and the network directs a visitor to the nearest or best-performing server. This approach can speed up DNS resolution times significantly.
- Redundancy: Having multiple DNS servers provides redundancy. If one server is down or slow, another can step in to handle the request, thereby ensuring your website remains accessible and responsive.
Selecting a reliable and fast DNS provider is one way to ensure your website loads quickly. While it may not be the first thing you think of when you’re looking to speed up your website, it’s certainly a factor worth considering. PD Hosting, for instance, provides robust DNS services that help enhance the speed and reliability of your website.
DNS Resolution Time: What It Is and Why It Matters
DNS resolution time is the length of time it takes for a DNS server to resolve a domain name into its corresponding IP address. It’s an essential factor in your website’s performance, as it’s the first step in the process of a user accessing your website.
When a user types in your website’s URL, their device sends a query to a DNS server to translate that URL into an IP address. The DNS server must locate the correct record among potentially millions and then respond with the IP address. This process is called DNS resolution, and the time it takes is the DNS resolution time.
The resolution time can vary based on a few factors:
- DNS Server Performance: The speed and efficiency of the DNS server play a significant role in the resolution time. A high-performance server can process and respond to queries more quickly than a slower one.
- Location of DNS Server: If the DNS server is geographically close to the user, the resolution time will typically be shorter. This is due to the lower latency involved in the communication between the user’s device and the server.
- Caching: If the DNS record for your site has been recently requested and is stored in the server’s cache, the server can respond with the cached data, significantly reducing the resolution time.
- DNS Records: The structure and configuration of your DNS records can also impact resolution time. For instance, using CNAME records can potentially slow down DNS resolution because they require additional lookup steps.
Why does DNS resolution time matter? Because it directly impacts your website load time. A shorter DNS resolution time can make your website appear faster to users, leading to a better user experience, lower bounce rates, and potentially higher search engine rankings. Conversely, a long DNS resolution time can make your website seem slow, even if everything else is optimized for speed.
At PD Hosting, we understand the importance of quick DNS resolution times, and we provide a robust DNS infrastructure to help ensure fast, efficient website loading for all our customers.
The Role of DNS Caching in Site Performance
DNS caching is a key element that significantly impacts the speed and efficiency of your website. It’s a mechanism where the result of a DNS lookup (the corresponding IP address for a domain name) is stored locally, either on the user’s device, their Internet Service Provider (ISP), or even the DNS server itself.
This process is beneficial for several reasons:
- Increased Speed: When the DNS lookup result is cached, future requests for the same domain name can be resolved instantly without the need for additional network communication. This significantly reduces the DNS resolution time and, as a result, the website loading time.
- Reduced Bandwidth Usage: By storing DNS responses locally, there’s a reduction in the number of DNS queries sent over the network. This decrease in traffic helps save bandwidth, which is beneficial, especially for users and ISPs with limited bandwidth capacities.
- Decreased Server Load: DNS caching also reduces the load on DNS servers. Without caching, each request would need to reach the DNS server for resolution. With caching, the DNS server needs to respond only once, after which the result is stored and reused, reducing the server’s workload.
- Improved Availability: In the event a DNS server becomes temporarily unavailable, DNS caching allows previously resolved domain names to remain accessible, improving the overall availability of websites.
While DNS caching significantly enhances site performance, it’s crucial to consider the cache duration, also known as Time-To-Live (TTL). TTL is the period during which the DNS response is considered valid. Once this duration has expired, a fresh DNS lookup is required. As a site owner, you’ll need to balance the benefits of long TTLs (improved performance) against the need for quicker DNS changes (shorter TTLs).
At PD Hosting, our DNS services are designed to maximize the benefits of DNS backup and caching, thereby ensuring a seamless and efficient browsing experience for your site visitors.
Navigating DNS Propagation
When you make changes to your DNS records, such as altering IP addresses, updating nameservers, or adding new records, these changes aren’t applied instantaneously across the internet. The process through which these changes are updated and become globally visible is known as DNS propagation.
Understanding DNS propagation and its mechanics is vital for website owners and administrators, especially when making critical updates to your domain’s DNS configuration. This understanding can help mitigate potential issues like website downtime or inconsistency in DNS responses during the propagation period.
In the following sections, we’ll dive deeper into the nuances of DNS propagation, why it’s necessary, and how to navigate through it. We’ll also shed light on how to check the status of DNS propagation and provide some helpful tips for smoother DNS changes.
Hold tight as we demystify the intricacies of DNS propagation!
DNS Propagation Explained
DNS propagation is the process through which DNS servers across the world update their cached records to reflect changes made to a domain’s DNS configuration. The term “propagation” is used because the updates start from your DNS server and then spread, or “propagate,” to all other DNS servers globally.
For instance, if you modify an A record for your domain, this change isn’t instantly recognized worldwide. Instead, the updated information slowly propagates through thousands of DNS servers across the globe. Once a DNS server receives the updated information, it stores (or “caches”) this information for a specific period, defined by the “Time to Live” (TTL) value in your DNS settings.
This propagation process is why you might sometimes experience a delay before your website becomes accessible via a new IP address after you’ve made changes in your DNS records. It’s also why some users might see the updated version of your site before others; their local DNS servers might have received and cached the updated records before other servers.
It’s worth noting that DNS propagation is not a synchronized process. Some DNS servers might update faster than others due to factors like network latency, server load, and the efficiency of the server’s DNS software. As such, the propagation process can take anywhere from a few minutes to 48 hours or more to complete, depending on these variables and the TTL value set for your DNS records.
In the next sections, we will delve into why DNS propagation is necessary and how to check the status of DNS propagation for your website.
Why Is DNS Propagation Necessary?
DNS propagation is necessary to ensure that the changes you make to your DNS records reach all DNS servers worldwide. This system-wide propagation is crucial because DNS is an integral part of how the internet operates.
Whenever you type a URL into your web browser, your computer performs a DNS lookup to translate that URL into an IP address, which it uses to fetch the associated web content. For this system to work, the DNS server your computer contacts needs to have the most recent DNS record information for the domain you’re trying to access. If the server’s DNS records are outdated, your computer won’t be able to locate the domain’s current IP address, and you won’t be able to reach the site.
DNS propagation is what keeps these DNS records up-to-date across all servers. When you update a DNS record for your domain, that change needs to propagate to every DNS server, so the updated record information is available to any computer performing a DNS lookup for your domain. Without propagation, DNS record changes wouldn’t reach all servers, resulting in inconsistent browsing experiences for different users.
As an analogy, imagine you move to a new house and change your address with the postal service. For your mail to reach you, this updated address needs to propagate through their system so that any post office trying to deliver your mail knows where to send it. In much the same way, DNS propagation ensures your website’s “address” (its IP address) updates across the internet when you change your DNS records.
In the next section, we’ll explain how to check the status of DNS propagation when you’ve made changes to your DNS records.
How to Check the Status of DNS Propagation
When you update your DNS records, you might be eager to see your changes go into effect. But because DNS propagation can take up to 48 hours, it might be a while before you see any changes. Luckily, there are online tools that can help you check the status of DNS propagation.
Here are the steps to check DNS propagation:
- Choose a DNS Propagation Checker Tool: There are various free online tools that you can use to check DNS propagation. Some popular ones include DNSChecker, WhatsMyDNS, and Google’s Dig web interface.
- Enter Your Domain: Once you’ve selected a tool, enter your domain into the provided search field. Most tools don’t require the ‘www’ prefix, so you can just type in ‘yourdomain.com’.
- Select the DNS Record Type: If you’re looking to check propagation for a specific DNS record type (like an A, CNAME, or MX record), select that type from the options provided. If you’re unsure, you can choose ‘ANY’ or ‘ALL’ to check all record types.
- Search: Hit the search or check button, and the tool will perform a DNS lookup for your domain on a variety of DNS servers worldwide. It’ll then show you the results of these lookups.
- Interpret the Results: The tool will display the DNS records for your domain as seen by each server it checked. If DNS propagation is still in progress, you’ll see different results for different servers. If propagation is complete, you should see the same result (the updated DNS record) for all servers.
Remember, the propagation of DNS changes doesn’t occur instantly. It can take anywhere between 24 to 48 hours for the changes to fully propagate worldwide. During this time, some users might be directed to your old site, while others might see your new site, depending on the DNS servers they’re using. Therefore, it’s good practice to make DNS changes during off-peak hours or when you expect lower traffic to your site to minimize the impact on users.
Conclusion
Understanding DNS is crucial for managing your website effectively. From setting up DNS records to troubleshooting common DNS issues, a solid grasp of these concepts can make your journey in web management much smoother.
At the same time, we recognize that DNS management can be complex, and not everyone has the time or the inclination to become a DNS expert. That’s why PD Hosting offers robust domain management services with an intuitive interface and round-the-clock support.
Whether you’re a seasoned webmaster looking to streamline your workflow, or a small business owner setting up your online presence, PD Hosting makes domain registration and DNS management a breeze.
Check out our Domain Registration Services for more information and to get started.
Thank you for sticking with us through this comprehensive guide to DNS. We hope it’s given you the tools and knowledge you need to navigate DNS with confidence.
Frequently Asked Questions about Domain Name System (DNS)
DNS, or Domain Name System, is a decentralized naming system for computers, services, or other resources connected to the Internet or a private network. It translates human-readable domain names into IP addresses, which are used to connect to the website’s server.
DNS works in a step-by-step process involving different servers. When you type a URL into your browser, the DNS process kicks in, translating that URL into the corresponding IP address through a series of queries.
There are various types of DNS records, including A, AAAA, CNAME, MX, and TXT records. Each serves a specific function, like pointing a domain to an IP address or defining the mail server.
DNS is essential for your website because it enables users to reach your website using a domain name, which is easier to remember than an IP address. It also plays a vital role in email delivery, website uptime, and even your site’s loading speed.
DNS propagation is the time it takes for all DNS servers worldwide to update their cached information for a specific domain after a change in DNS records.
DNS affects your website’s speed and performance primarily through DNS lookup time and resolution time. Optimizing these processes can lead to faster website loading times.
DNSSEC (Domain Name System Security Extensions) adds an extra layer of security to the DNS lookup process by allowing DNS records to be digitally signed. This way, users can be sure they are connecting to the correct server and not a malicious one.
Troubleshooting common DNS problems often involves checking DNS configurations, ensuring records are set up correctly, understanding DNS propagation delay, and seeking help from your hosting provider’s support team if needed.
DNS management involves handling and controlling the DNS records associated with your domain name. This includes updating, deleting, and adding DNS records like A, MX, CNAME, TXT records and others, which control different aspects of your domain, such as website location and email delivery.
It depends on your specific situation. If you’re transferring your domain to a new hosting provider and want to use their DNS servers, you’ll need to change your NS (Nameserver) records to point to your new host’s nameservers. If you’re only changing registrars but keeping the same hosting provider, you may not need to change your NS records.
No, NS and A records serve different functions within the DNS system. NS (Nameserver) records determine which servers will communicate DNS information for a domain, essentially pointing where the DNS information resides. On the other hand, A (Address) records link your domain to an IP address, directing where your website is hosted.
Yes, you can redirect your website by changing your DNS records. The simplest method is by adjusting your A record to point to the new IP address of the destination site. However, this change will not provide a true HTTP redirection. For a more advanced redirection, you might need to set up a 301 redirect on your server, which will inform search engines that your site’s address has permanently moved and transfer SEO rankings to the new site. Always consult with a professional or your hosting provider to ensure proper setup.
Remember, changes to DNS records can take time to propagate, so your site may not immediately reflect these changes.
Registering a domain name is a straightforward process. You can search for the availability of your desired domain name on the PD Hosting domain registration page. If it’s available, you can purchase it and follow the steps to complete the registration process.
Yes, you can transfer your domain to a different registrar. PD Hosting offers a hassle-free domain transfer service. Make sure your domain is eligible for transfer, typically your domain must be at least 60 days old and not close to expiry.
Typically, a domain transfer takes between 5 to 7 days to complete. However, the exact time can depend on the releasing registrar. Rest assured, PD Hosting’s support team is available to assist you throughout the transfer process. More details can be found on our Knowledge Base, domain and DNS page.
The cost for domain registration varies based on the domain extension (.com, .co.uk, .net, etc.) and the registration period. PD Hosting offers competitive pricing for all domain extensions. Detailed pricing information can be found on our domain pricing page.
Registering a .co.uk domain with PD Hosting is a simple and straightforward process. Just visit our UK domain registration page, search for your desired domain name, and follow the steps to complete the registration.
Yes, there are unique rules and requirements for registering a .co.uk domain, including regulations about the length of the domain name, allowed characters, and restrictions on certain domain name structures. Furthermore, certain regulations apply to the Registrant Contact’s identity and privacy, as well as the Name Servers’ settings. For a comprehensive overview of these rules and requirements, check out our detailed guide: .UK Domain Name Rules and Requirements.